| |||||
 |


LCD Overhead Projector - Previously On Instructables
*-* Click images for Huge PicturesForeword
This was previously an Instructable to build a LCD video projector. I'm using a free LCD that had a bad backlight inverter and a 3M 9550 overhead projector. I'm posting this because my setup differs from the typical video projector because I needed to extend the video cable that runs the horizontal pixels on the monitor since my cable cut across the monitor.
Link to Another Set of Instructions (Tom's Hardware)
*****IMPORTANT NOTE/REVISION!!!*****
*****The original spacing off the the glass isn't quite far enough away to prevent browning in the very center of the monitor. I doubled the original distance to about half an inch of space and haven't had any more trouble.*****
Step One: Find a Projector
In my case I came by a LCD monitor that was broken, however if you are setting out to build an LCD projector from scratch you'll want a projector first, so that you can
suitably fit a monitor to it, rather than the other way around.
Projector Troubleshooting Tips
Important Purchasing Considerations:
Get the largest projector that you can, this way you can get a bigger screen and usually more available light (larger projectors are going to run larger wattage bulbs). Get a name brand projector (3M, etc). These are typically constructed a lot better than the run of the mill projector, also major brands tend to have better distribution so finding parts (if needed) and replacement bulbs will be cheaper. Get a projector with a good fan already in it. Some projectors don't have fans and this will be the first thing you'll end up adding, so you're better off getting a projector with one in the first place!
Some places to look for overhead projectors:
Good Will
~
or other suitable place that takes donations from the community, these are probably your cheapest and easiest place to get one from, there stock will probably rotate depending on donations so don't be surprised if they have 4 one day and none the next
~
Universities or Community Colleges
~
Universities are quickly phasing out their stock of overhead projectors in favor of real projectors or document cameras. Look at local university web sites and search for "surplus" or "items for sale" or consider calling the university/college directly and ask if they sell surplus items, lots of them have very poorly advertised stores that they sell their surplus equipment from, or they may refer you to a larger college that sells their surplus for them.
~
Rummage Sales/Craigslist/Ebay
~
Local sources of overheads are much better than Ebay since you won't have to pay shipping for this huge fairly heavy box, if you've exhausted all other places I would point towards Ebay but you may soon be up into the price of just buying a "real" projector
~
Step Two: Find a LCD Monitor
Now you'll need to measure out the dimensions of your projector. Unfortunately projectors are meant for pieces of paper, so you'll want to fit the shorter width of your
projector to the longer length of the LCD monitor. That said, if you wanted to go all out you can change the projector projection direction, but I haven't tried it yet. (the fresnel lense that bends the light to meet the upper lens will work if you rotate the upper lens 90*, so sideways projection should work) You'll probably be matching something around 10" or 11" wide if you have one of the large projectors.
Common LCD Display Sizes:
Quoted Size - width x height (inches)
4:3 Aspect
10" - 8 x 6
12" - 9.6 x 7.2
15" - 12 x 9
17" - 13.6 x 10.2
16:9 Aspect
10" - 6.5 x 4.9
12" - 7.8 x 5.9
15" - 9.8 x 7.4
17" - 14.8 x 8.3
Source: LCD Monitor Sizing
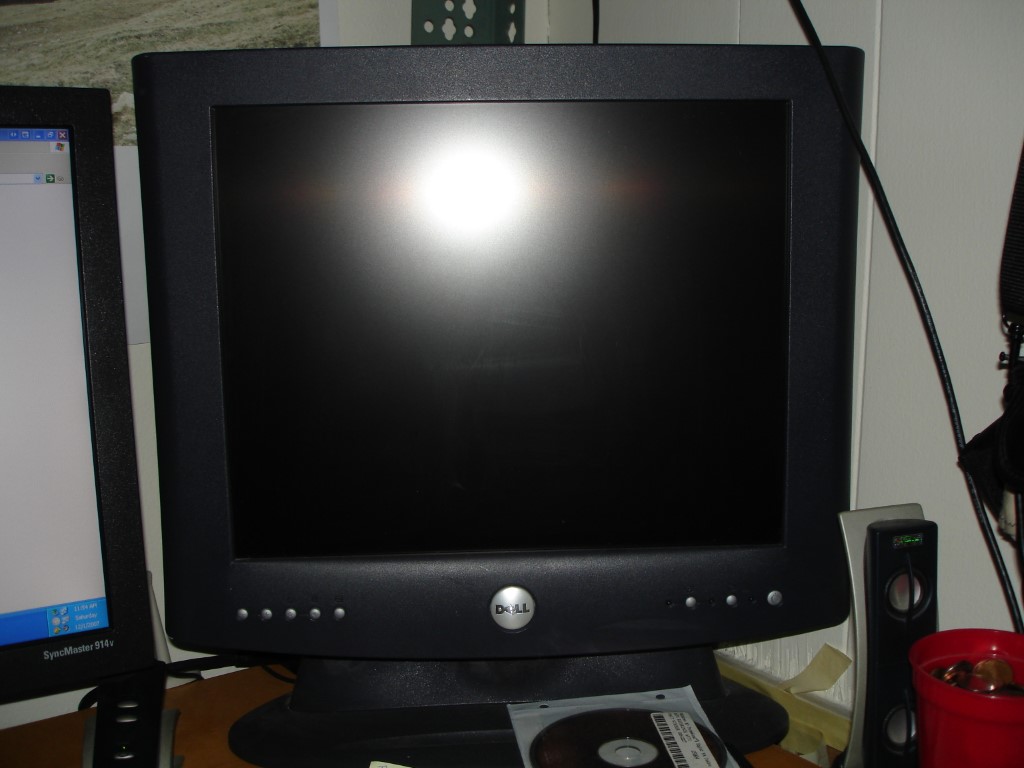
I ended up with a 15" 4:3 monitor. Although I have a slight overhang on each side it works out quite well.
Tips for getting a CHEAP monitor!
Look for monitors the are "broken". What you want to find is a monitor that doesn't light up. The best way to get one of these is to have the person shine a flashlight at an extreme angle at the front of the monitor and see if the image that is normally there is visible with a flashlight. This means that the backlight that normally lights the monitor has died, and for this project the first thing we'll be doing is taking out the backlight so it's really not important to us that it doesn't work. The reason the backlight stops working is generally that something in the board that drives the backlight (called an inverter) that steps up the 12 volts in the monitor to several thousand volts to light the florescent bulb has failed. As a side note this is generally about $30-$50 for a new one, so if you're hunting for cheap monitors this is often a way to do it if you know how to fix it and where to get the parts from.
So find yourself a cheap "busted" monitor and lets get taking it apart!
Common LCD Display Sizes:
Quoted Size - width x height (inches)
4:3 Aspect
10" - 8 x 6
12" - 9.6 x 7.2
15" - 12 x 9
17" - 13.6 x 10.2
16:9 Aspect
10" - 6.5 x 4.9
12" - 7.8 x 5.9
15" - 9.8 x 7.4
17" - 14.8 x 8.3
Source: LCD Monitor Sizing
I ended up with a 15" 4:3 monitor. Although I have a slight overhang on each side it works out quite well.
Tips for getting a CHEAP monitor!
Look for monitors the are "broken". What you want to find is a monitor that doesn't light up. The best way to get one of these is to have the person shine a flashlight at an extreme angle at the front of the monitor and see if the image that is normally there is visible with a flashlight. This means that the backlight that normally lights the monitor has died, and for this project the first thing we'll be doing is taking out the backlight so it's really not important to us that it doesn't work. The reason the backlight stops working is generally that something in the board that drives the backlight (called an inverter) that steps up the 12 volts in the monitor to several thousand volts to light the florescent bulb has failed. As a side note this is generally about $30-$50 for a new one, so if you're hunting for cheap monitors this is often a way to do it if you know how to fix it and where to get the parts from.
So find yourself a cheap "busted" monitor and lets get taking it apart!
Step Three: Tear the Monitor Apart!
Alright, so now you should have your monitor and a projector so lets get disassembling the LCD monitor.
- Disconnect power and let it sit for 5 minutes. This will bleed any power out of the capacitors and make the monitor safe to take apart. (modern electronics have bleeder resistors across any high voltage circuitry like the inverter and will render them safe in a short time)
- Remove the base, this should be about 4 screws where the base attaches to the back of the monitor.
- Remove any screws from the monitor, usually there are several on the back.
- Run your finger nail or use a stiff plastic tool around the seam around the perimeter - usually you can get the monitor cases split somewhere and then work your way around from that point.
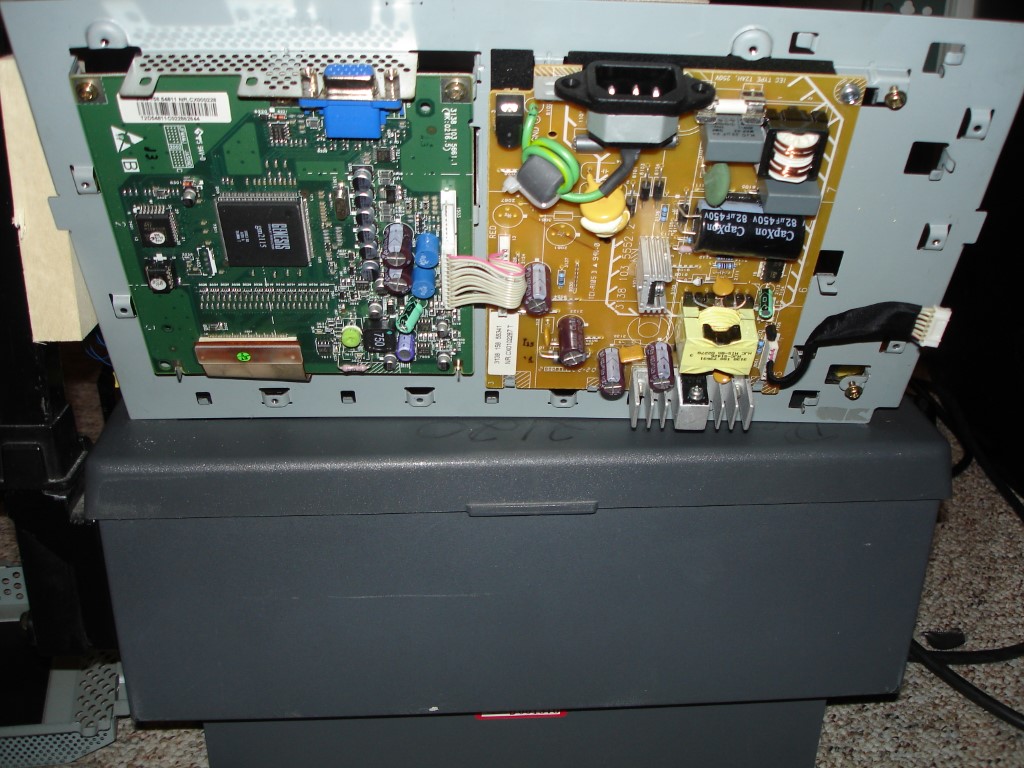
- CAREFULLY lift off the back cover of the monitor, you should be looking at something like the picture below. Please watch out for any wires when you're lifting off the cover, if there is anything linking the two case halves at this point just carefully disconnect/untape them and set the back of the monitor aside.
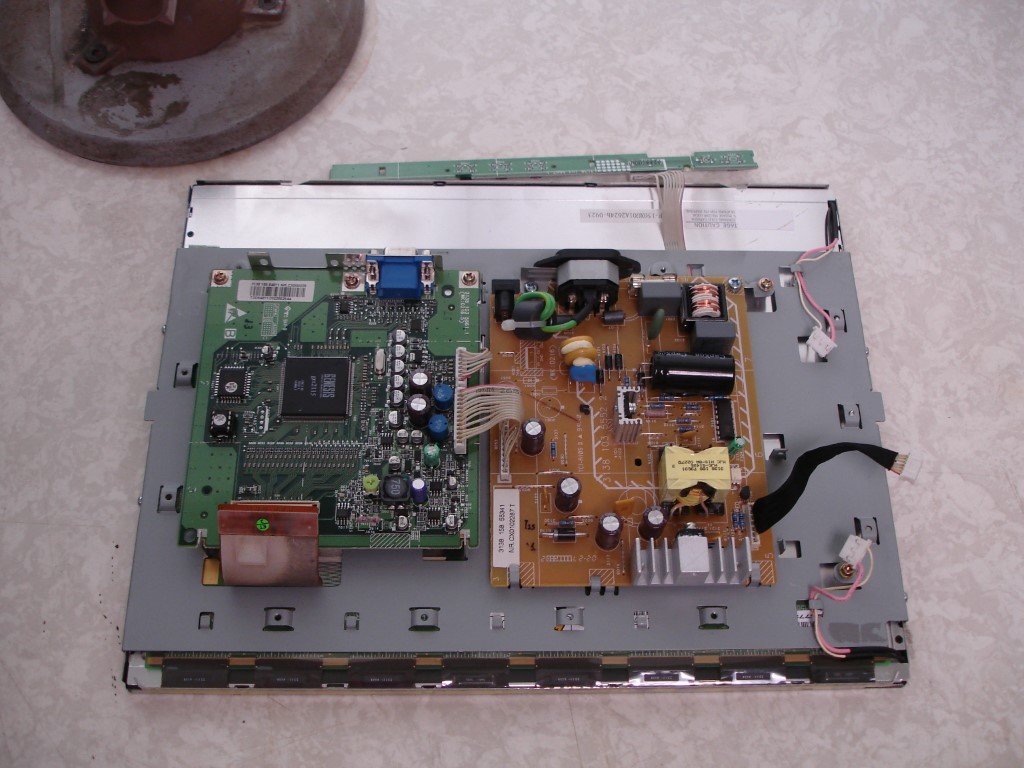
Image Notes
1. DVI/VGA to Low Voltage Differential Signal (LVDS - sends the pictures to the monitor)
2. Power Converter - this takes 120 AC or sometimes DC from the external power adapter, cleans it up and runs power to the LVDS and Inverter Boards
3. Power Inverter - was here, power inverter is sometimes combined with the AC/DC board, it's easy to spot because the board looks mirrored (it's driving two lights with identical circuits) and it'll have cables running to the top and bottom of the monitor
4. Front Control Panel - Makes sure you take good care of this board, they are easy to break and if you do bust it you'll probably not be able to get the monitor turned on ever again :(
Step Four: Remove LCD Back and Circuits
At this point I would highly recommend you get out your camera and take some pictures of the back of the LCD and the overall cabling paths and routing. This will help
you in the long run when you end up hooking the LCD back together after you've removed everything.
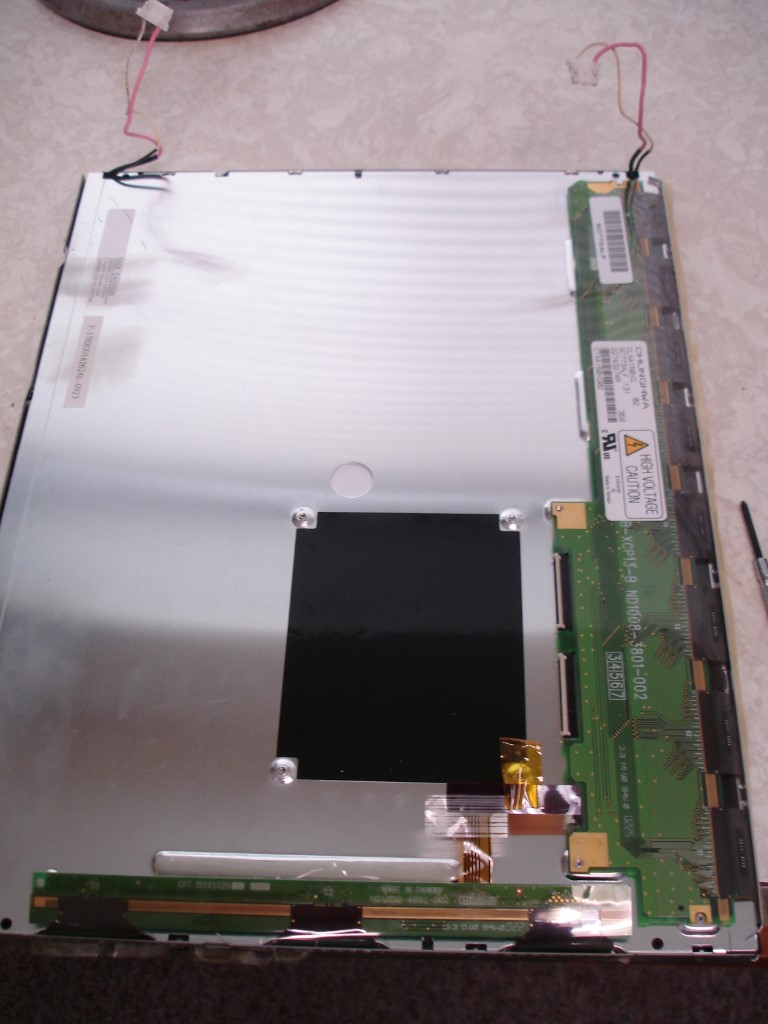
That said, get out a screwdriver and take off the back plate with all of the circuit boards attached to it. Now hopefully you'll be looking at something like the picture. I can't offer much more specific advice to removing everything as every monitor that I've ever seen is different in construction and assembly of the innards of the LCD monitor, even within the same companies.
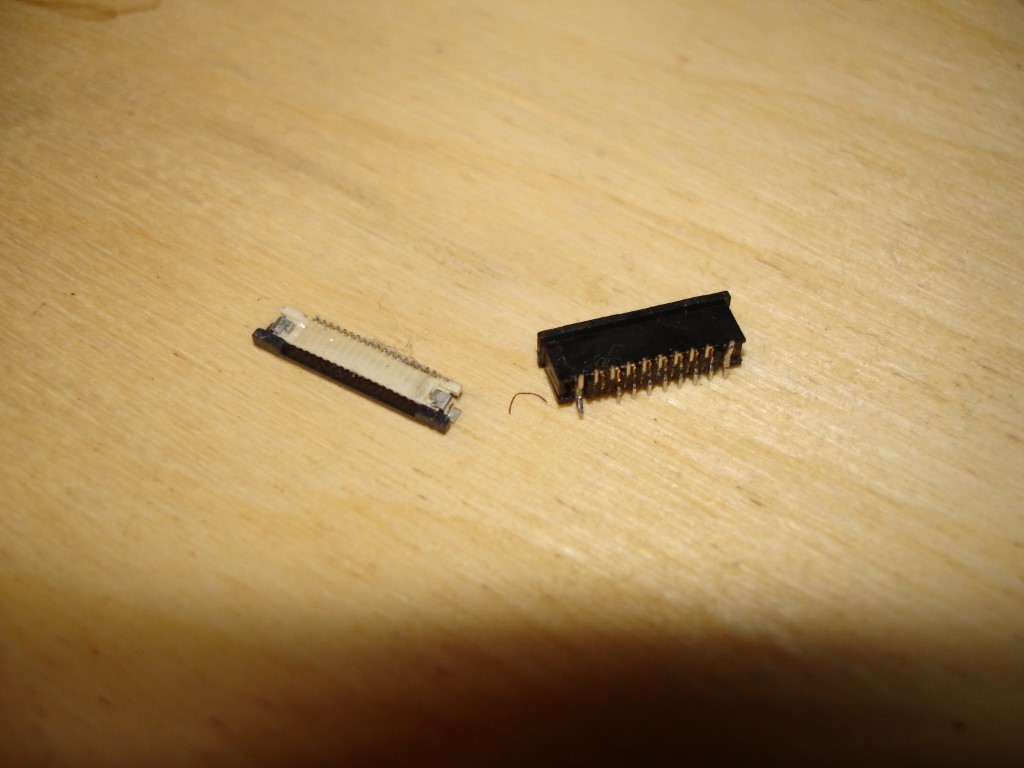
The connectors generally used with FPC/FFC circuits are called ZIF connectors, that stands for Zero Insertion Force. You must be very careful with these connectors, you need to either lift up a latch or slide out part of the connector to release the cable. DO NOT USE TOOLS to release these cables, if you are applying force at the rights spots they all will come loose with just your finger nail!
The connectors generally used with FPC/FFC circuits are called ZIF connectors, that stands for Zero Insertion Force. You must be very careful with these connectors, you need to either lift up a latch or slide out part of the connector to release the cable. DO NOT USE TOOLS to release these cables, if you are applying force at the rights spots they all will come loose with just your finger nail!
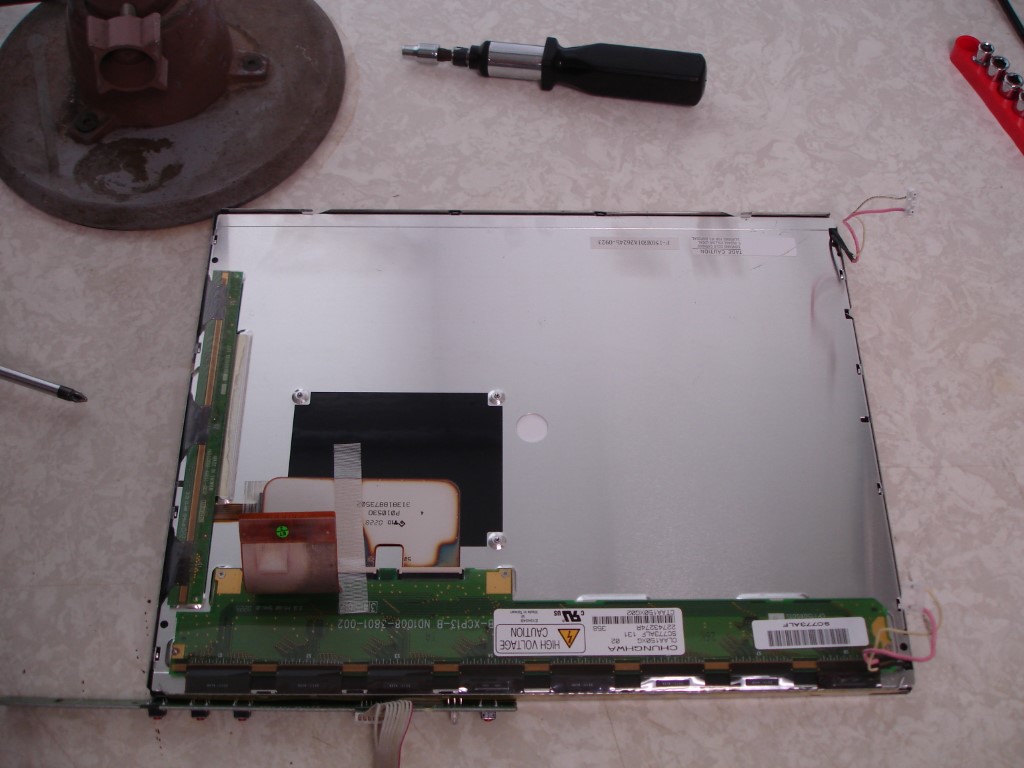
Image Notes
1. LVDS Cable
2. Vertical Pixel Circuit Board - This distributes signal to all of the vertical columns on the screen
3. Horizontal Pixel Circuit Board - Sends signal to all of the horizontal rows
1. LVDS Cable
2. Vertical Pixel Circuit Board - This distributes signal to all of the vertical columns on the screen
3. Horizontal Pixel Circuit Board - Sends signal to all of the horizontal rows
Step Five: Remove LCD Diffuser and Backlights
Now comes the tricky part. We need to remove the diffuser and backlights from the LCD panel so that we just have the glass screen. Generally around the perimeter of
the LCD panel there are 4 very small screws. Remove these screws and have the cabling all untaped and loose and then carefully peel away the back plate holds the
monitor together. You should expect several sheets of plastic, two light bulbs, and a large piece of acrylic to come sliding out of the monitor. You don't care about
anything but the very thin, very fragile glass panel that the circuit boards run into. Don't drop the LCD panel, but if anything else hits the floor don't be alarmed.
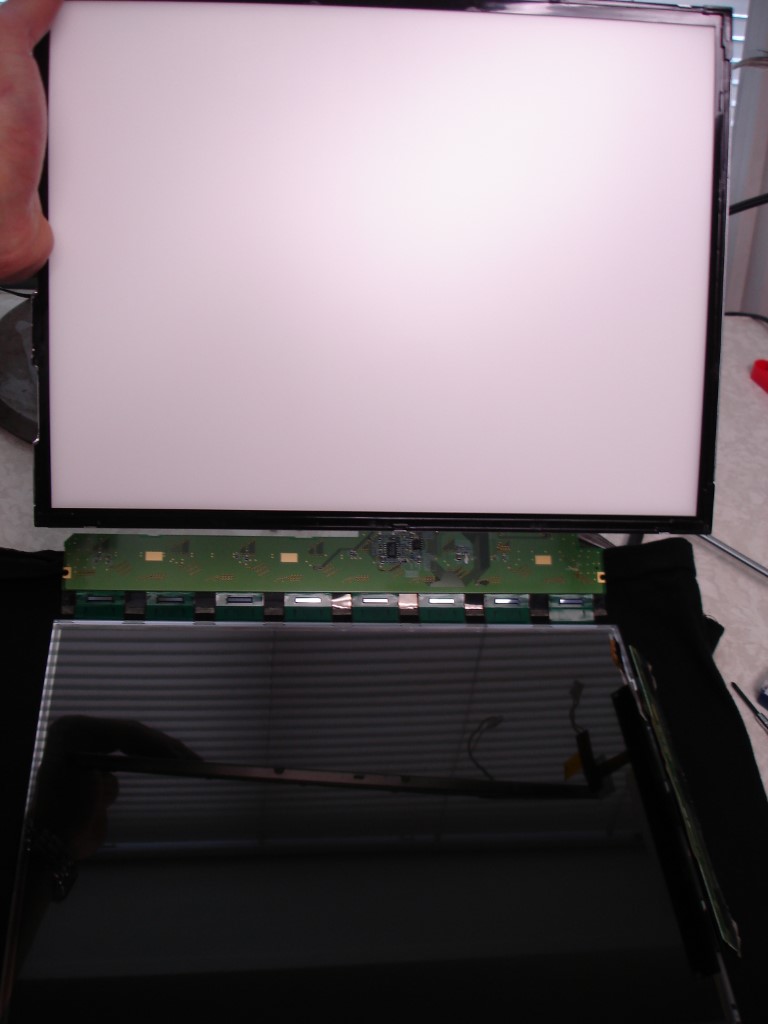
Image Notes
1. Diffuser, polarizer, acrylic sheet, backlights all reside in this blob
2. LCD glass panel safely resting on my work bench
3. Careful with the circuits, these are easy to catch on the top of the monitor while you're taking things apart
1. Diffuser, polarizer, acrylic sheet, backlights all reside in this blob
2. LCD glass panel safely resting on my work bench
3. Careful with the circuits, these are easy to catch on the top of the monitor while you're taking things apart
Step Six: Fix the LVDS Cable Run
Alright, so now you've successfully extracted the LCD panel from the packaging. It might be worth your time at this point to hook it back up to the original circuits to check that it still works, it also happens to look really cool since you're the current proud owner of a clear monitor, which would go pretty well on your desk? Well, if it still works and you still want a projector and not a cool desk ornament then we've got a little problem, if you remember earlier when you disconnected the LVDS cables that they ran across the corner of your monitor, right in the way of the projected path.
The only way to fix this is to make the cables longer, I tried two things. The first thing to address is that the spacing on the LVDS cables that I'm trying to extend are 0.5mm , this is the smallest pitch that you'll ever find on printed circuits as generally you can't place things any closer together without running a very high risk of bridging, even in commercial production!
Step Seven: First Attempt to Extend LVDS Cables
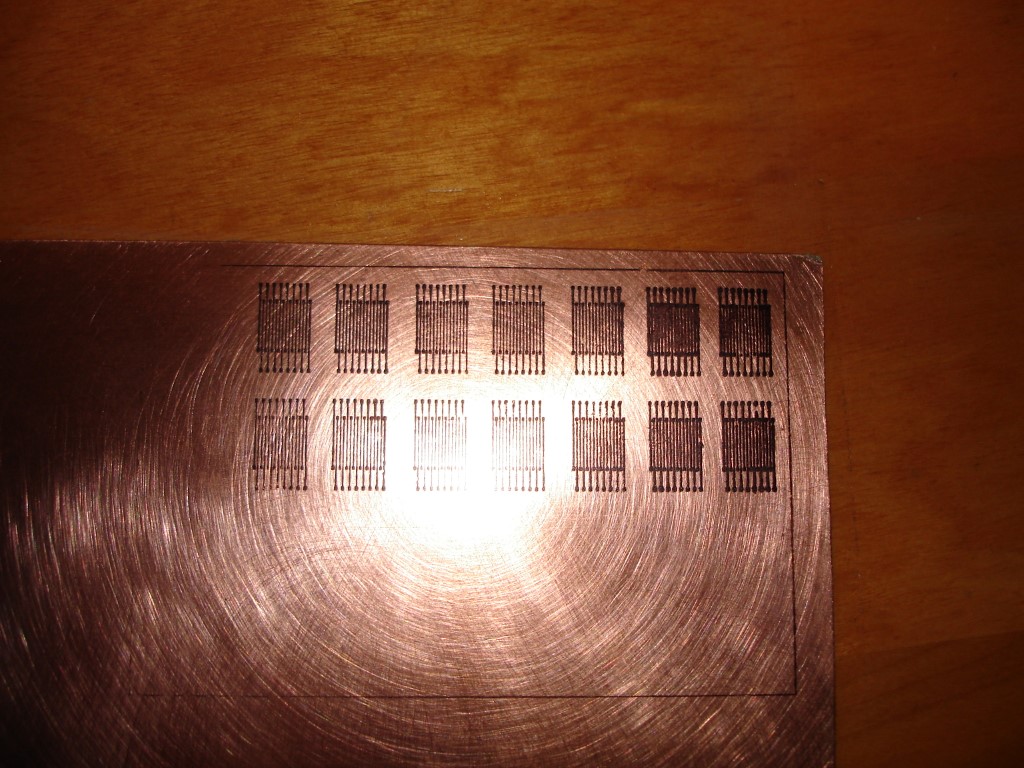
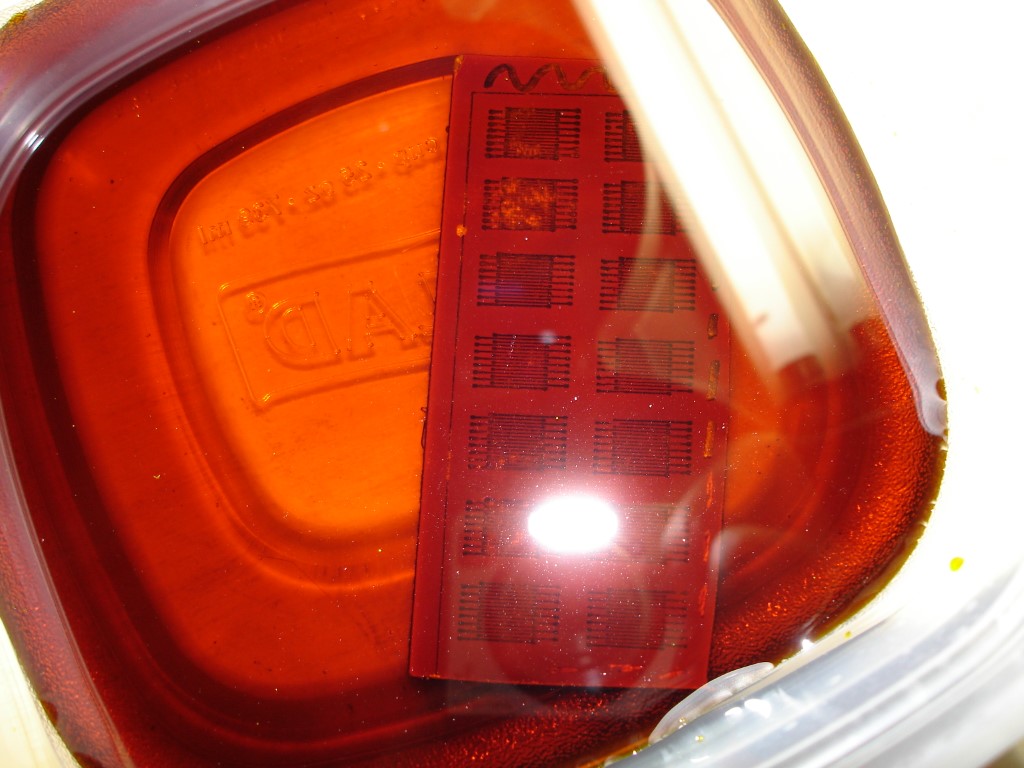
My first try was to print my own circuit board and then solder two connectors with a longer FPC/FFC cable to extend the cable. You can see that I was able to iron on
transfer small enough traces and also to etch off the copper. The problem came in when I tried soldering on the pads to the connectors, I would always end up with 200-
300 ohms between one or two pins, which is very difficult to fix after soldering everything on. So I gave up on my first try at printing boards and moved on to the
guaranteed fix. . .
Step Eight: LVDS Extension Success
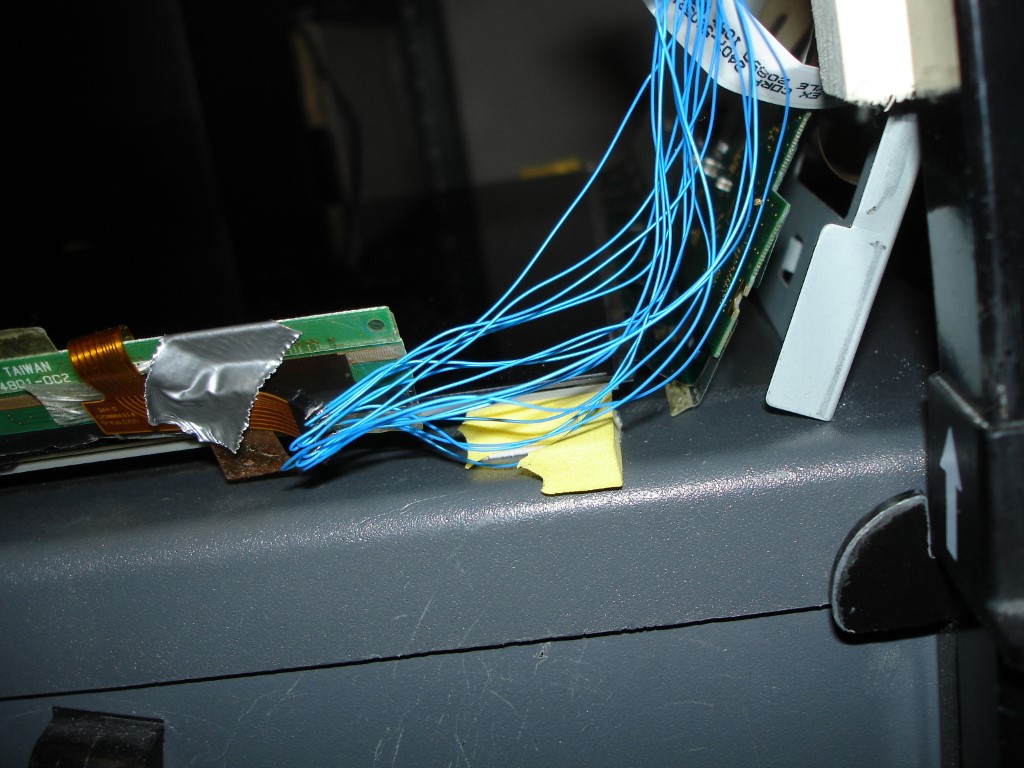
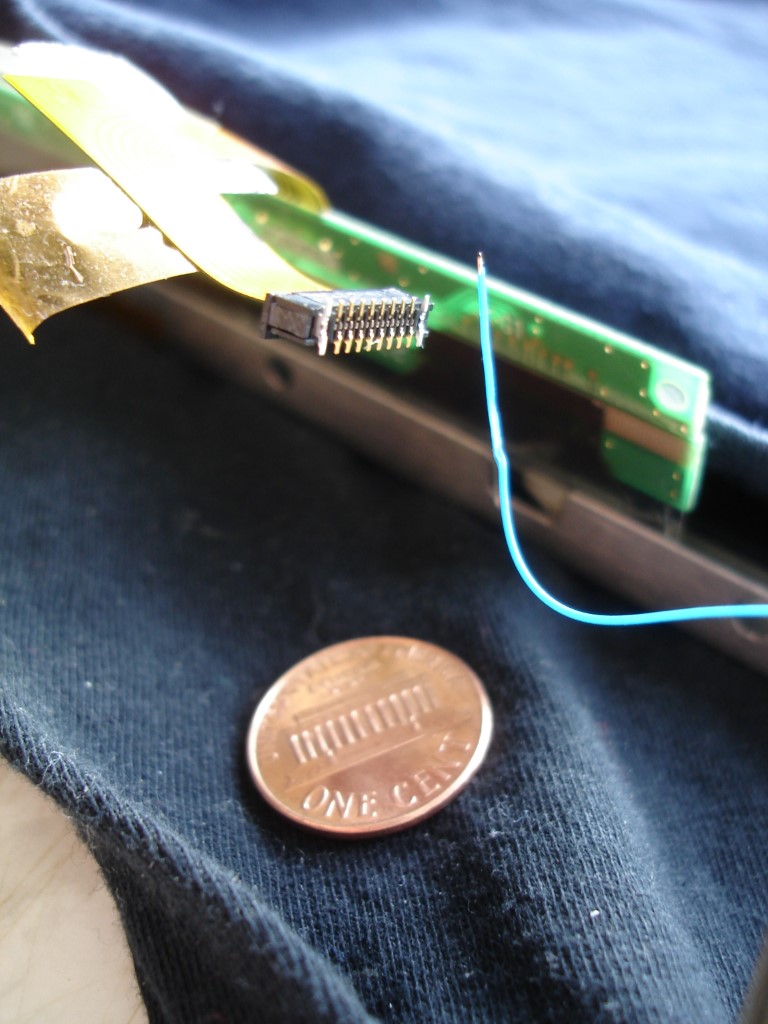
Alright, so printing a board doesn't work so well, but manually wiring each pin to another works perfect, too bad it's a little harder. . . I did this by hand with a 25 watt iron with a dremeled down tip, you can do it without anything special, just be careful and take your time, this is now 1 mm between pins since we're doing every other pin on each side of the connector. I ordered my connectors from Digikey, I wasn't able to find much by searching with their search engine, but I did find several pages in the online catalog dedicated to tons of FFC/FPC connectors and cables
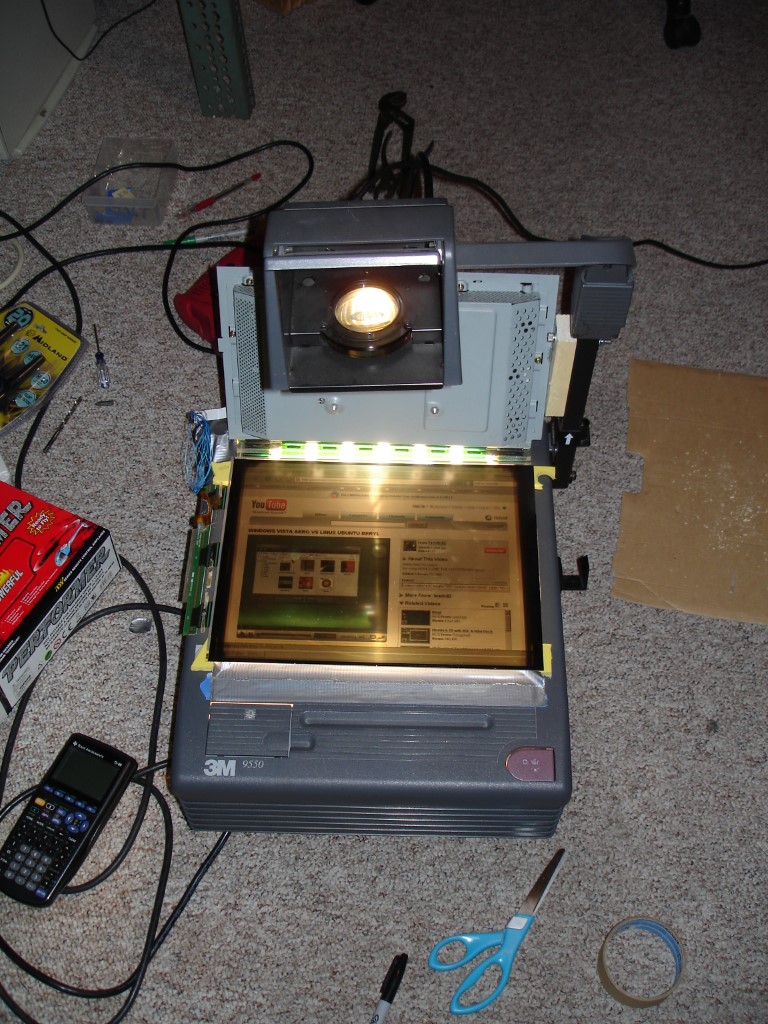
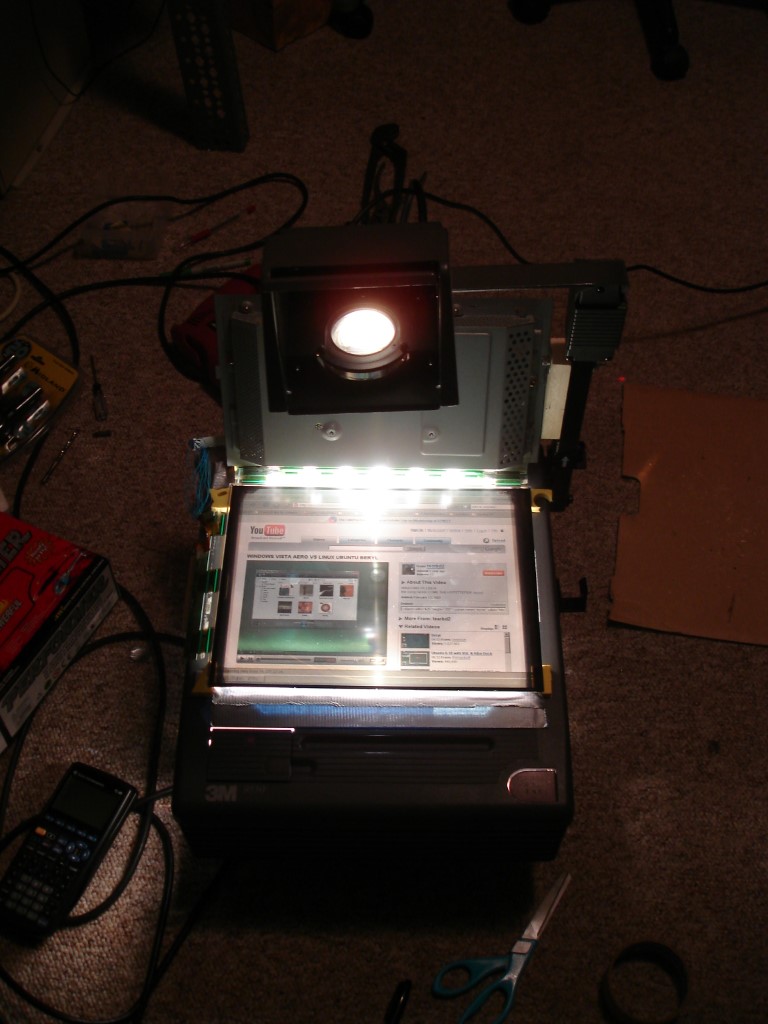
Step Nine: Mount the LCD on the Projector
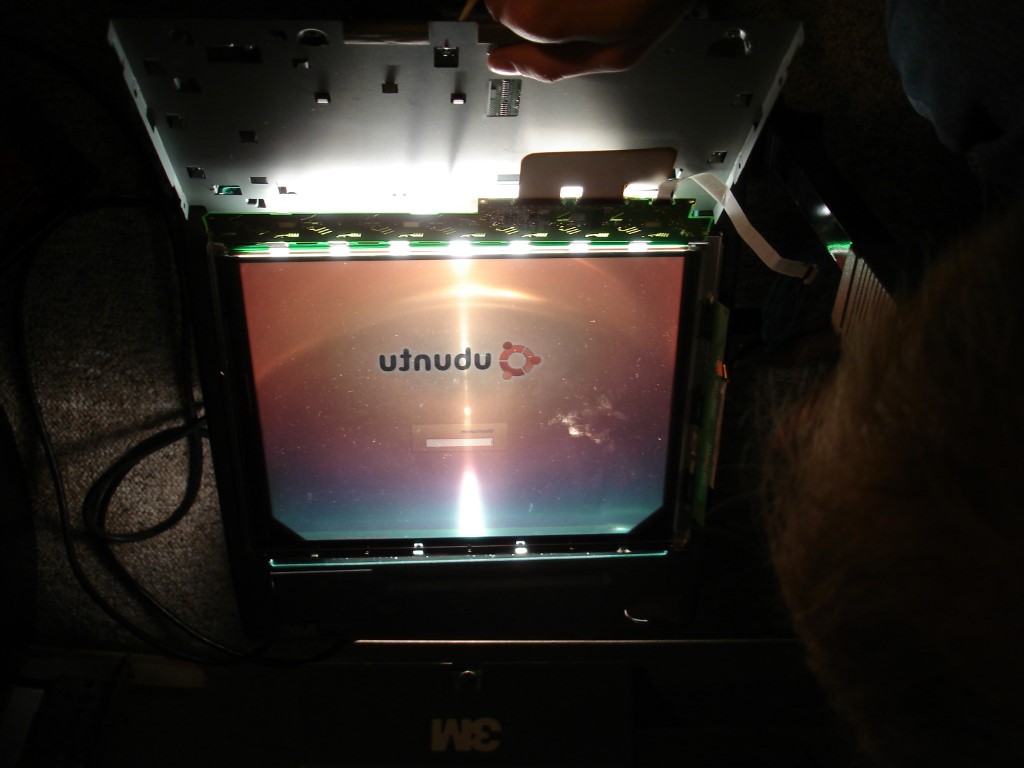
Alright, so you have your LCD all wired up so put it on the projector top. Do not place it directly on the glass, the glass will heat up too much and you will damage the panel. I spaced the LCD about 0.3 inches off the surface of the glass with some foam I had laying on my desk. I found that I did not need to add a fan to blow across the surface of the projector but I have seen it done to cut down on the heat build up. At this point fire up your projector and test out the screen, as you can see my first attempt at setting up the LCD resulted in a reverse projection. I had to flip over the screen and remount the LCD circuits

Step Ten: Mount the LCD Circuits on the Projector
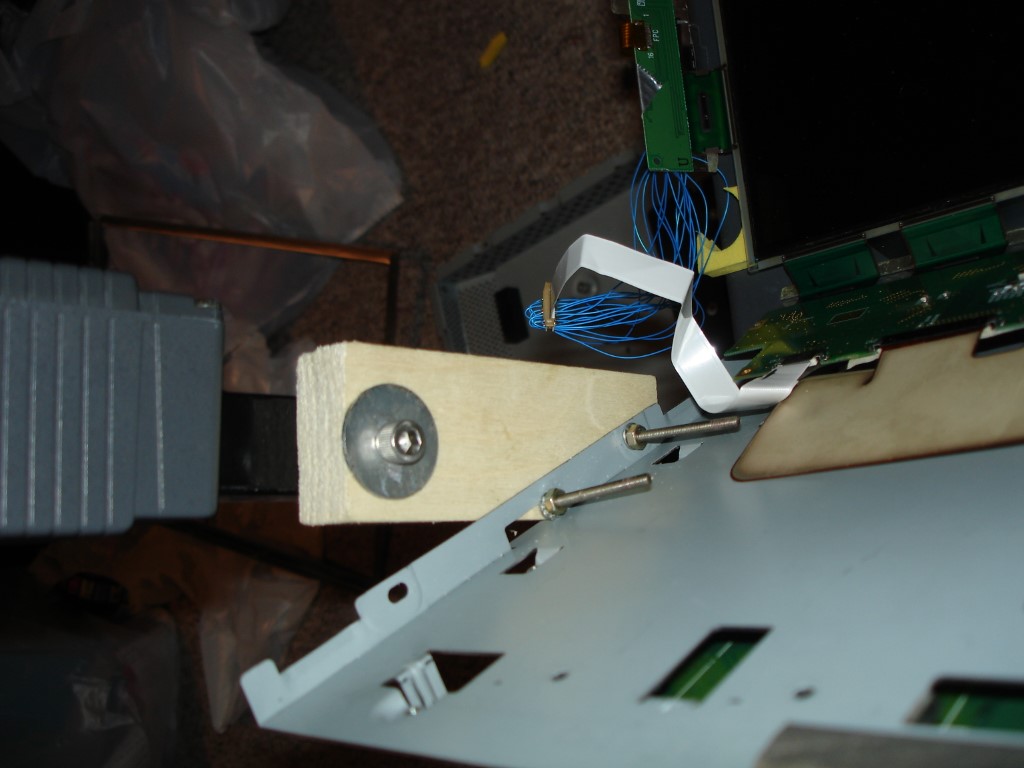
Finally, you'll need to mount the back of the LCD monitor within reach of the main LVDS cable that used to sit behind the LCD panel. I chose to drill a hole in the arm that holds up the upper lens/focus assembly and then mount the original monitor back to it. This put the LVDS cable just within reach of the original board and made things pretty clean looking.

Step Eleven: Enjoy the Show!
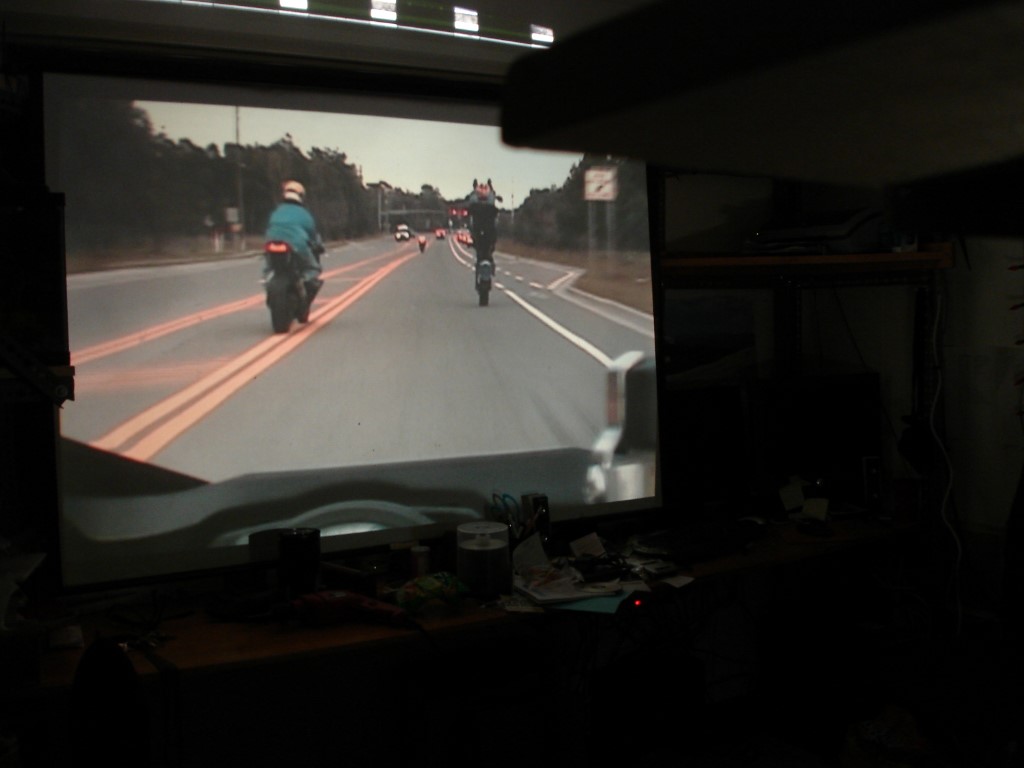
Alright, you should be ready for a little proof testing at this point. The best thing to do is to break out the popcorn and watch a movie. You should lightly feel the LCD panel for the first 20 minutes while the projector is getting up to temperature to make sure the LCD isn't getting too hot. From what I've read the screen will start to "brown out" if things get too warm, so watch out for that as well.
I was absolutely amazed by the quality of this setup, except for not having clean borders at the edges, this was easily as good as the real projectors that I see in classrooms all day. There are several advantages to this one though:
It's cheap!
Homemade ghetto cool factor!
Bulbs are a dime a dozen!
I tried to take a few pictures of it in action but it is difficult to photograph. To give you an idea of scale the picture is 79" diagonally, that's my 19" monitor off to the right on the desk. The movie is the newest Star Boys motorcycle stunt riding dvd.